It is the HOT season now and I am taking advantage of staying indoors where I can sew. But first a little garden update: We have been getting rain every couple of days so the garden is thriving in this heat and so are the bees. They have been busy making new comb, the queen is laying lots of eggs and larva, and the workers are consuming their sugar water as if they are starving. We, the Bee Fairies, go out at night and change the jars with filled jars while they sleep so not to disturb them unnecessarily. And not get stung!
The surrounding wildflowers are growing but I am now unable to get in there and weed, so it is what it is. The bees don't seem to mind. I am anxious to see the floral display and will share a picture soon. I did manage to snap a quick picture of some volunteer Forget-Me-Nots that seeded last year. They are bi-annuals and one of the few flowers you can find that are true blue. So pretty!
I mentioned in previous posts that I signed up for Kori-Turner's sew along. I have fallen behind in the making of Jaye's Bouquet quilt but have not given up (in other words, packed it up in a box as a future UFO). The present block I am embroidering is Block #2 featuring ...ta da... Forget-Me-Nots! That's good timing, right? This block is working up nicely. I traced the forget-me-nots pattern sheet by taping it to a bright window, then taping my fabric over the design to be traced. My own take on a lightbox. What is your favorite technique?
Kori recommends using a pigma pen to trace the design on the fabric. I am afraid of an unsteady hand and making a mark that I shouldn't so I am using a pencil. But next time I will use a harder lead pencil for finer lines.
Another tip of Kori's that I did not follow is using interfacing behind the stitch work area. My mother always taught me to keep my work as neat on the back as on the front. You can work over your thread tails in the beginning of each loaded needle and again "weave" the ending thread through your completed work before cutting off. Look good? No knots and unsightly thread moving between the flowers. Mom would be pleased.
The Forget-Me-Nots are embroidered using a combination of chain stitches and back stitches using two strands of floss. Simple emough. I love the little daisy stitches on each petal, don't you? Another tip my mother taught me was to use only one stand of floss and make your stitches tiny! This is the technique I chose for the flower centers. The French knots will be made using Sue Spargo's wool blend WonderFil Ellana.
I have not made any of the quilt blocks for this project yet. I figured the embroidery blocks were more labor intensive and wanted to get those completed first. The quilt blocks are simple, yet charming, and they lend themselves to some embroidery embellishments also. I'm still considering that while this is turning out to be a really fun project.
Let me mention the little "tool" I made for my completed embroidered blocks. This Noodle Embroidery Wrap was a kit found in Kori's shop but you can make your own. It is a pool noodle cut to your desired length, and covered with a piece of fabric. You can embellish it with embroidery stitches but I just used a blind stitch. What I did do differently was I made 2 yo-yos and sewed them to each end to hide the pleats. Now instead of folding my embroidered blocks (a no-no) I can simply store them by rolling them on the noodle wrap. No more fold lines! Nice, right?
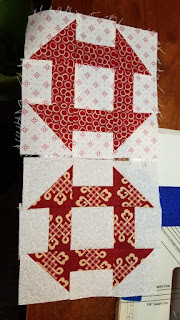
Meanwhile, in the sewing room I have been working on my red Churn Dash quilt. These charming little 6" blocks have been in the works by my sewing table for the last 2 years, I think. They were a sew along at Temecula during Christmas of that year. Did you participate?
I chose a different setting after finding a pretty border fabric by Maywood Studios at our local quilt shop that was closing last spring. There was only 2 1/2 yards so I had to hold my breath that I had enough!
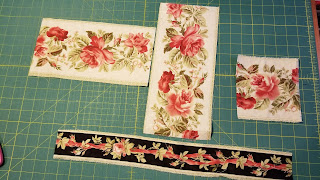
Leftover pieces.
My original plan was to have the black borders run in the center and 4 sides, but there was not enough of those black borders.
I considered using the narrow "half strip" that ran on the selvage but...nah! Too much "make do". (see above). So I picked out all those stitches (very carefully) to remove the center. VERY carefully!
I then used that center black border as the final bottom border instead.
It is better on the eyes now, don't you agree? I added a soft green 2" border so my longarm quilter would have more of a seam allowance on the edges to work with. Look how close it was (below). I could count the threads! Probably because I tore the strips to ensure they were perfectly straight. Unfortunately when you do tear fabric, it "bruises" the edges but I was willing to accept that for the true grain and straight edge.
And I purchased a 2/3 yard remnant of a black floral from this Maywood Studios line so it is being reserved for the binding. (lucky me to find this piece!) Presently, this quilt top (flimsey) has been delivered to my LAQ (along with Abby's finished Dogs and Cat quilt top - see last post) and I expect them back in a few weeks. My Churn Dash quilt will be pretty on our bed this Christmas. And Abby's Dogs and Cat quilt will hang at the Geauga County Fair this year. Hope she wins some recognition!
And I hope you are enjoying your time in your sewing room too.
Happy stitching!


