2020 will soon be here! Funny 2020 used to be something I only gave thought to if reading/watching something in the science fiction genre! But here we are, nonetheless, and hopefully you have as much anticipation and excitement for the times ahead as I do!
2019 was a good year in the sewing room. I finished a total of 6 quilts. Counting all the yardage, I used up a total of 81.5 yards of stash! Not too bad, I thinks, and this doesn't include the 2 quilts I got to the flimsy stage(Minecraft, and Antique Tiles), and another (Scrappy Strips) nearly finished with only the borders to sew on. This leaves some quick finishes to reach my goals for next year.
My goal list for the first quarter will be posted soon as I mull over my listing of UFOs. There are so many projects waiting and yet I add to the list by beginning some new starts...like...
Scrap Dash New Year's Mystery. Now here is a fun project that has peaked my interest. A small project, so no guilt here. Surely I can finish this Round the Mountain Mini Mystery and get it to the quilting stage for some quiet evening hand work.I have picked a couple of charm packs for inspiration. I will decide further tomorrow morning as the first clue comes out.
Another mystery that has caught my attention is Merry Mayhem's Around the Corner. I have some yardage pulled for this but am waiting to see what it will look like exactly before committing. I know, I am cheating. It won't be a true mystery, right? My original intention was to make it queen size so I just want to be sure, wouldn't you? Hopefully it will be a fast project and I'll zip it up in a week or two.
So not only am I looking forward to next year, and all that it brings, but I am also looking forward to tomorrow! It's snowing, the house is clean, the laundry is caught up, so it is full steam ahead!
Happy New Year!
Tuesday, December 31, 2019
Thursday, December 12, 2019
Nothing Beats a Challenge
In my way of thinking anyway. It must link back to my double-dog-dare days.
December is usually crunch time in the sewing room, but this year I have not had any last minute projects. So, I got in a cleaning up the sewing room mood and found this box of Christmas theme scraps.
 As I sorted through this stuffed box lots of memories came to mind of past gifts, stockings, ornaments, and quilts as gifts, along with the people I gave them to. These little scraps (anything under a fat quarter) gave me warm feelings and a sense of value. After all, I have saved them all this time.
A sudden rush of excitement came over me as I questioned, "how many quilts/projects can I get out of this box until it is empty?" I always find it amazing just how far our scraps will go. They never seem to run out, do they? And the thrill of having an empty box, well, that really motivated me. So, countdown to Christmas ...
 These sweet Hexagon Origami Ornaments were a fast little craft. I cut out several stabilized hexagons and took them with me to our Thanksgiving gathering so the Grands and I could have a little craft time together. I found this demo on YouTube if you want to try them yourself. I'll be using these as gift labels that can be reused as ornaments.
 More gift labels were made using a fun project from Suzy Quilts. (I mentioned these last month with a link to her free pattern). I also had a couple of ratty potholders but they were still useful because they were so thick. I made new covers in a pillowcase type fashion, slipped the pot holder inside, and then slip stitched the opening closed. A few hand quilted stitches sandwiched everything together nicely so nothing shifts after washing, and they are now ready for more use in the kitchen. Easy!


I don't remember where this row of reindeer fabric came from but I cut, and pieced a few 4-square blocks, and it grew into the pictured mini quilt/tabletopper/placemat. I had enough of these fabrics to make two toppers! One is hand quilted and ready for gifting. The second will be finished soon as I like to do handwork in my chair in the evenings.

 This line of fabrics was another unknown and of varying widths so I practiced an improv techique (sew as you go). It is "so improv" that I even ran out of binding and had to piece about 4 inches of another fabric in. Can you find it? It is kind of busy but I am happy with the result. The back I used an old Daisy Kingdom remnant. Remember that line of fabric that was popular in the 80's? I quilted it in a big hand stitch which gives it a handmade look.
 It has been a year for Dresdens. (See previous posts) I made 2 of these mini dresdens and backed them with felt. I quilted the layers together and they made nice little placemats for the table. (I failed to photograph the other one before I gave it away). I like these so well I may have to make one for myself!
 AND look at this little darling! I found this pattern idea at The Singer Featherweight Shop website. It is a spool pin cushion for your featherweight vintage sewing machine. It adorns your machine and also prevents and scratching from your spinning spool. Now don't we have everything? (I have yet to poke the center hole in.)
I guess I need to begin thinking bigger...or I will never empty this box!
 How about a Mistletoe Lane Quilt? This pattern is a fast and easy project. After cutting the required strips, I sat and pieced the blocks together in one afternoon! Now I'm stuck debating on whether to add a narrow sashing or just sew them together and get it done! These are pictured over my Minecraft quilt that is also a work in progress. I love how these Mistletoe Lane blocks look on the diagonal. I used up a lot of fabric making these but I still have more in the box....
 How about a pink Christmas? I found these leftovers and made 2 table runners. This one is pin basted and ready for quilting. The other will follow. More fun projects for the evening chair.

 I can include this quilt in this challenge even though it began last year. (scraps originated in this box) It was a quilt along at Temecula Quilt Company. (have you seen this year's?) I recently finished sewing it together and the quilting is now done for completion. I used a remnant of muslin for the backing making it soft to lay under. My last big finish for the year I suppose. It measures 44" x 57" and I calculated 8 yards of total stash busted. It is presently draped over the chair for anyone needing some coziness that only a quilt can give.
 I have bundled together several more future projects. A Debbie Mumm panel with matching fabrics, a few remaining charms, whimsical remnants, snowmen panels, and various other scraps and groups by color.
 And they STILL fill up the box! How can that be? Oh well, I still have 3 more weeks in December.
December is usually crunch time in the sewing room, but this year I have not had any last minute projects. So, I got in a cleaning up the sewing room mood and found this box of Christmas theme scraps.

A sudden rush of excitement came over me as I questioned, "how many quilts/projects can I get out of this box until it is empty?" I always find it amazing just how far our scraps will go. They never seem to run out, do they? And the thrill of having an empty box, well, that really motivated me. So, countdown to Christmas ...
 These sweet Hexagon Origami Ornaments were a fast little craft. I cut out several stabilized hexagons and took them with me to our Thanksgiving gathering so the Grands and I could have a little craft time together. I found this demo on YouTube if you want to try them yourself. I'll be using these as gift labels that can be reused as ornaments.
 More gift labels were made using a fun project from Suzy Quilts. (I mentioned these last month with a link to her free pattern). I also had a couple of ratty potholders but they were still useful because they were so thick. I made new covers in a pillowcase type fashion, slipped the pot holder inside, and then slip stitched the opening closed. A few hand quilted stitches sandwiched everything together nicely so nothing shifts after washing, and they are now ready for more use in the kitchen. Easy!

I don't remember where this row of reindeer fabric came from but I cut, and pieced a few 4-square blocks, and it grew into the pictured mini quilt/tabletopper/placemat. I had enough of these fabrics to make two toppers! One is hand quilted and ready for gifting. The second will be finished soon as I like to do handwork in my chair in the evenings.

 This line of fabrics was another unknown and of varying widths so I practiced an improv techique (sew as you go). It is "so improv" that I even ran out of binding and had to piece about 4 inches of another fabric in. Can you find it? It is kind of busy but I am happy with the result. The back I used an old Daisy Kingdom remnant. Remember that line of fabric that was popular in the 80's? I quilted it in a big hand stitch which gives it a handmade look.

I guess I need to begin thinking bigger...or I will never empty this box!
 How about a Mistletoe Lane Quilt? This pattern is a fast and easy project. After cutting the required strips, I sat and pieced the blocks together in one afternoon! Now I'm stuck debating on whether to add a narrow sashing or just sew them together and get it done! These are pictured over my Minecraft quilt that is also a work in progress. I love how these Mistletoe Lane blocks look on the diagonal. I used up a lot of fabric making these but I still have more in the box....

 I can include this quilt in this challenge even though it began last year. (scraps originated in this box) It was a quilt along at Temecula Quilt Company. (have you seen this year's?) I recently finished sewing it together and the quilting is now done for completion. I used a remnant of muslin for the backing making it soft to lay under. My last big finish for the year I suppose. It measures 44" x 57" and I calculated 8 yards of total stash busted. It is presently draped over the chair for anyone needing some coziness that only a quilt can give.

Saturday, November 30, 2019
November is for Turkeys
And November is great for preparing for Christmas and the new year. May I mention, we are entering a new decade on January 1st? I am hoping to finish this present decade with some fun finishes and warm memories with friends and family.
I missed linking up my goals for the last quarter Finish Along. (so bummed)
 But I was the winner of a $25 gift certificate from Sew Me A Song at the end of our last quarter! I purchased this lovely little bundle and made Sew Me A Song a favorite shop on etsy for future *needs*. Thanks Becca! It really IS fun to participate in the Finish Along!
I've been having some sewing fun making a few smalls for Christmas. They are satisfying quick finishes that I like to focus on this time of year. I recovered a couple of potholders that have seen better days. They were quite ratty looking but thick and useful so I decided to re-cover with Christmas scraps.
Another fun project I found was from Suzy Quilts. She is currently giving this free pattern for quilted ornaments. They are fairly easy to make and I plan to use them as gift labels since I did not stuff them. You can visit Suzy Quilts for more sewing ideas. I love her new pattern, Tail Feathers, which these ornaments are a mini replica.
Presently on my design wall is my Minecraft quilt. Oh my, I am so excited to get this done! I know some people who are going to love cuddling under this!! This project comes from Kelli Fannin at Seriously, I Think it Needs Stitches. (hilarious! I love her humor!)

Kelli has done an incredible job of drafting these patterns out with accuracy. I have not had one problem (other than my own mix ups) while making these blocks. Beware, the dragon blocks were quite involved though. Approach with much patience and determination! I simply need to sash the blocks and join the rows. I hope to finish before the end of the year and get it to my long arm quilter. It should be completely finished during the cold winter months of Ohio. Perfect timing!
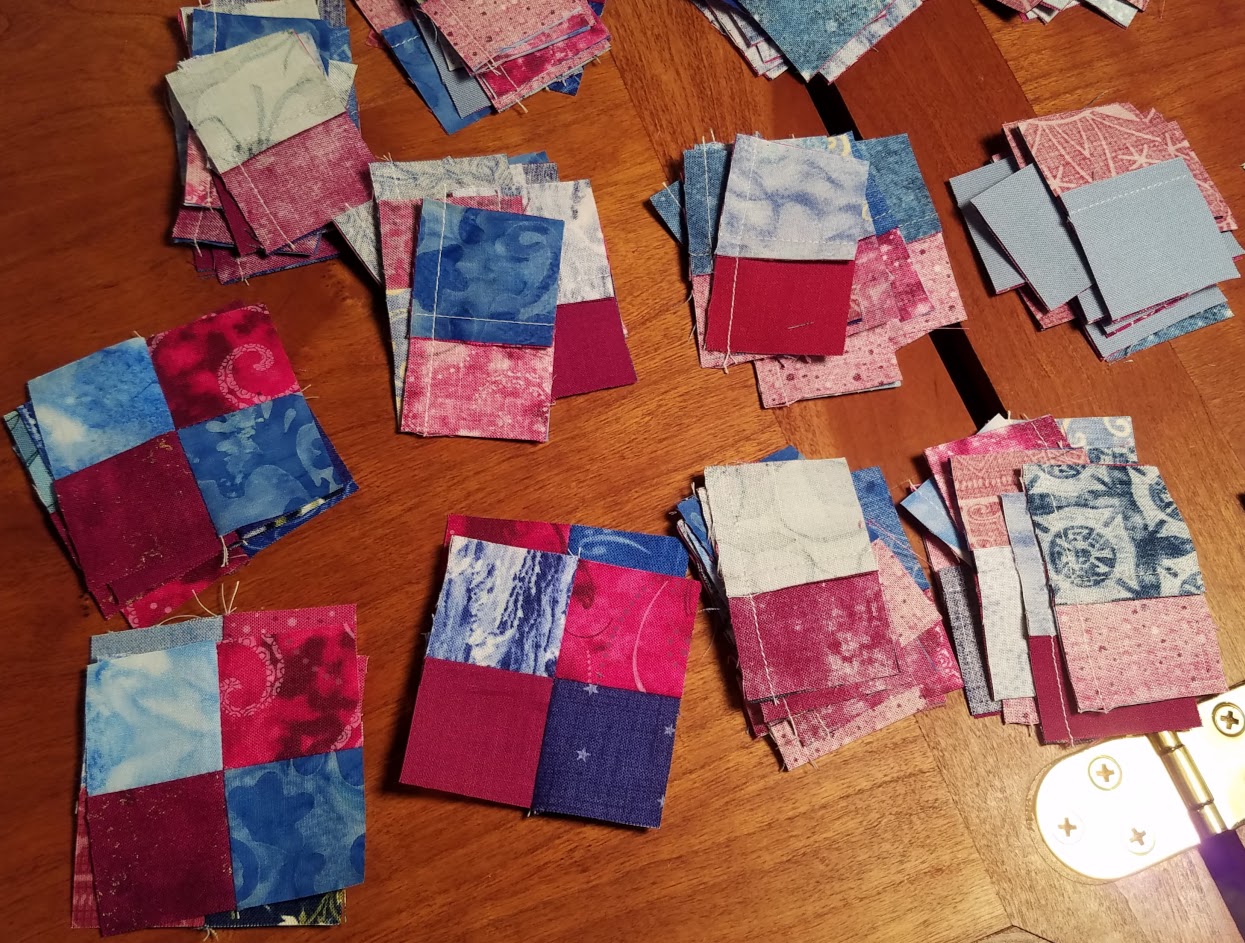
And you know what else I always look forward to in November? Yep! Bonnie Hunter's annual mystery quilt along! She never disappoints, does she? I've had my fabric pull ready for a few weeks now. I love these color combinations.


This year's Frolic Mystery began on Friday, November 29th and I almost have all my 4 patches completed. These little darlings make me anxious for the next clue. This will be a finish for 2020 since all clues will not come out until January. It is not too late to begin your mystery quilt. Visit Bonnie's site for her weekly clues. They won't be posted long before she takes them down.
 One last project that I've been tackling this year is my Burgoyne Surrounded Christmas quilt. It was a project that began last year as a sew along at Temecula Quilt Company. Sheryl always has such pretty ideas with tiny prints.
My quilt will finish as a throw size. Although the binding is on, I previously machine quilted it in the ditch between each block and am now adding hand quilting stitches for fun. I love the texture it brings.

Ahhh...this feeling doesn't last long.
Happy stitching!
I missed linking up my goals for the last quarter Finish Along. (so bummed)
 But I was the winner of a $25 gift certificate from Sew Me A Song at the end of our last quarter! I purchased this lovely little bundle and made Sew Me A Song a favorite shop on etsy for future *needs*. Thanks Becca! It really IS fun to participate in the Finish Along!
 I've been having some sewing fun making a few smalls for Christmas. They are satisfying quick finishes that I like to focus on this time of year. I recovered a couple of potholders that have seen better days. They were quite ratty looking but thick and useful so I decided to re-cover with Christmas scraps.

Another fun project I found was from Suzy Quilts. She is currently giving this free pattern for quilted ornaments. They are fairly easy to make and I plan to use them as gift labels since I did not stuff them. You can visit Suzy Quilts for more sewing ideas. I love her new pattern, Tail Feathers, which these ornaments are a mini replica.
________
Presently on my design wall is my Minecraft quilt. Oh my, I am so excited to get this done! I know some people who are going to love cuddling under this!! This project comes from Kelli Fannin at Seriously, I Think it Needs Stitches. (hilarious! I love her humor!)

Kelli has done an incredible job of drafting these patterns out with accuracy. I have not had one problem (other than my own mix ups) while making these blocks. Beware, the dragon blocks were quite involved though. Approach with much patience and determination! I simply need to sash the blocks and join the rows. I hope to finish before the end of the year and get it to my long arm quilter. It should be completely finished during the cold winter months of Ohio. Perfect timing!
And you know what else I always look forward to in November? Yep! Bonnie Hunter's annual mystery quilt along! She never disappoints, does she? I've had my fabric pull ready for a few weeks now. I love these color combinations.

This year's Frolic Mystery began on Friday, November 29th and I almost have all my 4 patches completed. These little darlings make me anxious for the next clue. This will be a finish for 2020 since all clues will not come out until January. It is not too late to begin your mystery quilt. Visit Bonnie's site for her weekly clues. They won't be posted long before she takes them down.
 One last project that I've been tackling this year is my Burgoyne Surrounded Christmas quilt. It was a project that began last year as a sew along at Temecula Quilt Company. Sheryl always has such pretty ideas with tiny prints.
My quilt will finish as a throw size. Although the binding is on, I previously machine quilted it in the ditch between each block and am now adding hand quilting stitches for fun. I love the texture it brings.

Ahhh...this feeling doesn't last long.
Happy stitching!
Monday, October 7, 2019
Vintage Lace is completed
This was a fun quilt along offered by Brittany, of Lo and Behold Stitchery. I shopped my stash and was able to bust 12 1/4 yards of fabrics in my collection.

It was sewn into rows and was a really straight forward kind of pattern. I checked a few others that were uploaded on instagram and I love some of the colors used! I would love to make another. It was a quick and easy project. #vintagelacequilt

It is all finished now and measures 73" x 73". I love the paisley quilting pattern I chose. It fits the style of this quilt and it drapes so nicely. It will be safely stored for some future gift giving.
Another finish I can tick off on my 3rd Quarter Goal List.
Saturday, October 5, 2019
Dresdens for Friends
I recently committed myself to this project wondering afterwards what was I thinking? Hesitating, because I have so many other projects in the works (see goal list), but it was when someone said, "It will remind you of the friends we have here in our group" that got me. How can you say no to that? So here is to my Material Girl friends!
I chose the Dresden Plate block. It reminds me of the Rose Windows at the Notre Dame Cathedral in Paris. After the tragic fire this past spring I thought this would be a fitting tribute.
I will make them according to the colors each participant requests. The colors I chose are navy blue and gray. I am anxious to see what beauties I get back and will then have the opportunity to ponder a setting.
Assembling the dresden plate block is not too complicated if you are careful to sew true 1/4" seam allowances. Otherwise, you may have a wonky block that will not lay flat. Here are some tips I found along the way.
I used my Electric Quilt software program to make my templates. There are rulers you can also buy that will give you the perfect angles you need.


I chain piece each "spoke" and then clip the corner on the fold side, carefully not to cut into the seam allowance.

I then finger press this fold-line before I turn inside out so that my center is marked. (see above) Then I open the seams (below) and turn.

Can you see the fold-line marking the center? Now I can press with the seam centered on this fold mark.

This will give you perfect centered spokes that will be ready to sew together.

Lay two spokes, right sides together, and stitch a 1/4" seam along long edge. I begin this seam about 1/4" down and backstitch to beginning before sewing on to the end of the seam.

This is so your thread tails will be completely tucked inside when you applique the dresden plate to the background fabric.

Continue sewing pairs, then 2 pairs together, etc., until you plate is full circle.

One final press and she is ready to be basted to the background.

The back of my work shows how the thread tails are below the joining seams.

Now she is ready for applique. I baste onto the background fabric to ensure it will lay flat, basting along the outside edge and the inner circle edge. My background square is cut 1/2" larger than I need to compensate for any distortion that may arise from the applique process. It will later be trimmed to correct size once all hand sewing is complete.
Once it is appliqued I can add the center piece.
I want to trim the background fabric away on the back side so I am careful not to sew this center through all layers.
My finished dresden plate lays flat and is ready to be trimmed to the correct
Snowballs in September
This was such a fun quilt project because... I have participated for several years in the Charming Shop Hop here in our area. One of several perks to attending is choosing a variety of 5 inch charms at each quilt shop, so through the years, I have accumulated quite a large collection! These are the charms that I used for making this quilt. I found the idea at Temecula quilt along last year if you would like to make one of your own. They always are offering free patterns and quilt alongs to keep you motivated. And I love their fabrics!

My Snowball quilt measures 91" x 91" and I figured that it took 19 yards of stash to complete.

It is now quilted and labeled and ready for giving warmth. Don't you know I still have enough 5" charms leftover I could make another?
I can mark this finish off on my 3rd Quarter Goal List.

My Snowball quilt measures 91" x 91" and I figured that it took 19 yards of stash to complete.

It is now quilted and labeled and ready for giving warmth. Don't you know I still have enough 5" charms leftover I could make another?
I can mark this finish off on my 3rd Quarter Goal List.
Wednesday, July 24, 2019
Sunbonnet Sue Restoration
I began this project last year. This quilt belongs to my dear niece and she asked if I could try to revive some life into her. It was made, most likely during mid-twentieth century, by ladies in her hometown.

As you can see, she was in great need of repair.

I painstakingly removed the old, frayed pieces and traced with tissue paper the better parts of Sue for making new patterns. Pictured below you can see the worn condition of some of these Sues. (clicking on any picture will enlarge it for better viewing)
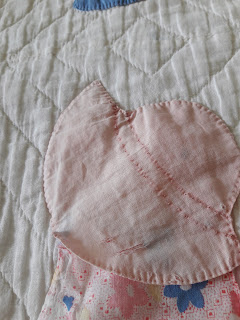
And take note of the tiny stitches used to "applique". I have not seen a running stitch as a method of applique before. But it works, and maybe I will try this method in the future on some of my quilts. It is certainly a faster technique than the traditional needle turn method.

After tracing on tissue paper, I carefully glued these tracings onto heavy paper. Once dry, I cut them out to size. Dresses, bonnets, shoes, sleeves and hands were made. When tracing these new pieces onto fabric, I would remember to add seam allowances when cutting them out because these paper patterns were of the exact size.

More than a few evenings were spent turning under raw edges and basting to prepare for applique. This method works best for me and I also have the benefit of laying them over the originals as a final measure that would ensure I got the size and placement correct.
My main goal was to make my footprint, or should I say, handprint small in working on this quilt. I used 30's era fabrics of the same colors of the original Sues, and only replaced what was absolutely needed to be replaced. Many of the fabrics were beyond hope (frayed, deteriorated, and/or missing).

She had a black embroidered band on her bonnet which I removed from most of the Sues because they were badly worn and frayed. I tried to leave a few that were in the best condition as an example of what was there.
Total stats were as follows:
Four Sues were completely replaced. (Bonnet, dress, sleeves, hand and foot)
Seven Sues' dresses were replaced but her shoes, sleeves and bonnets were kept from the original.
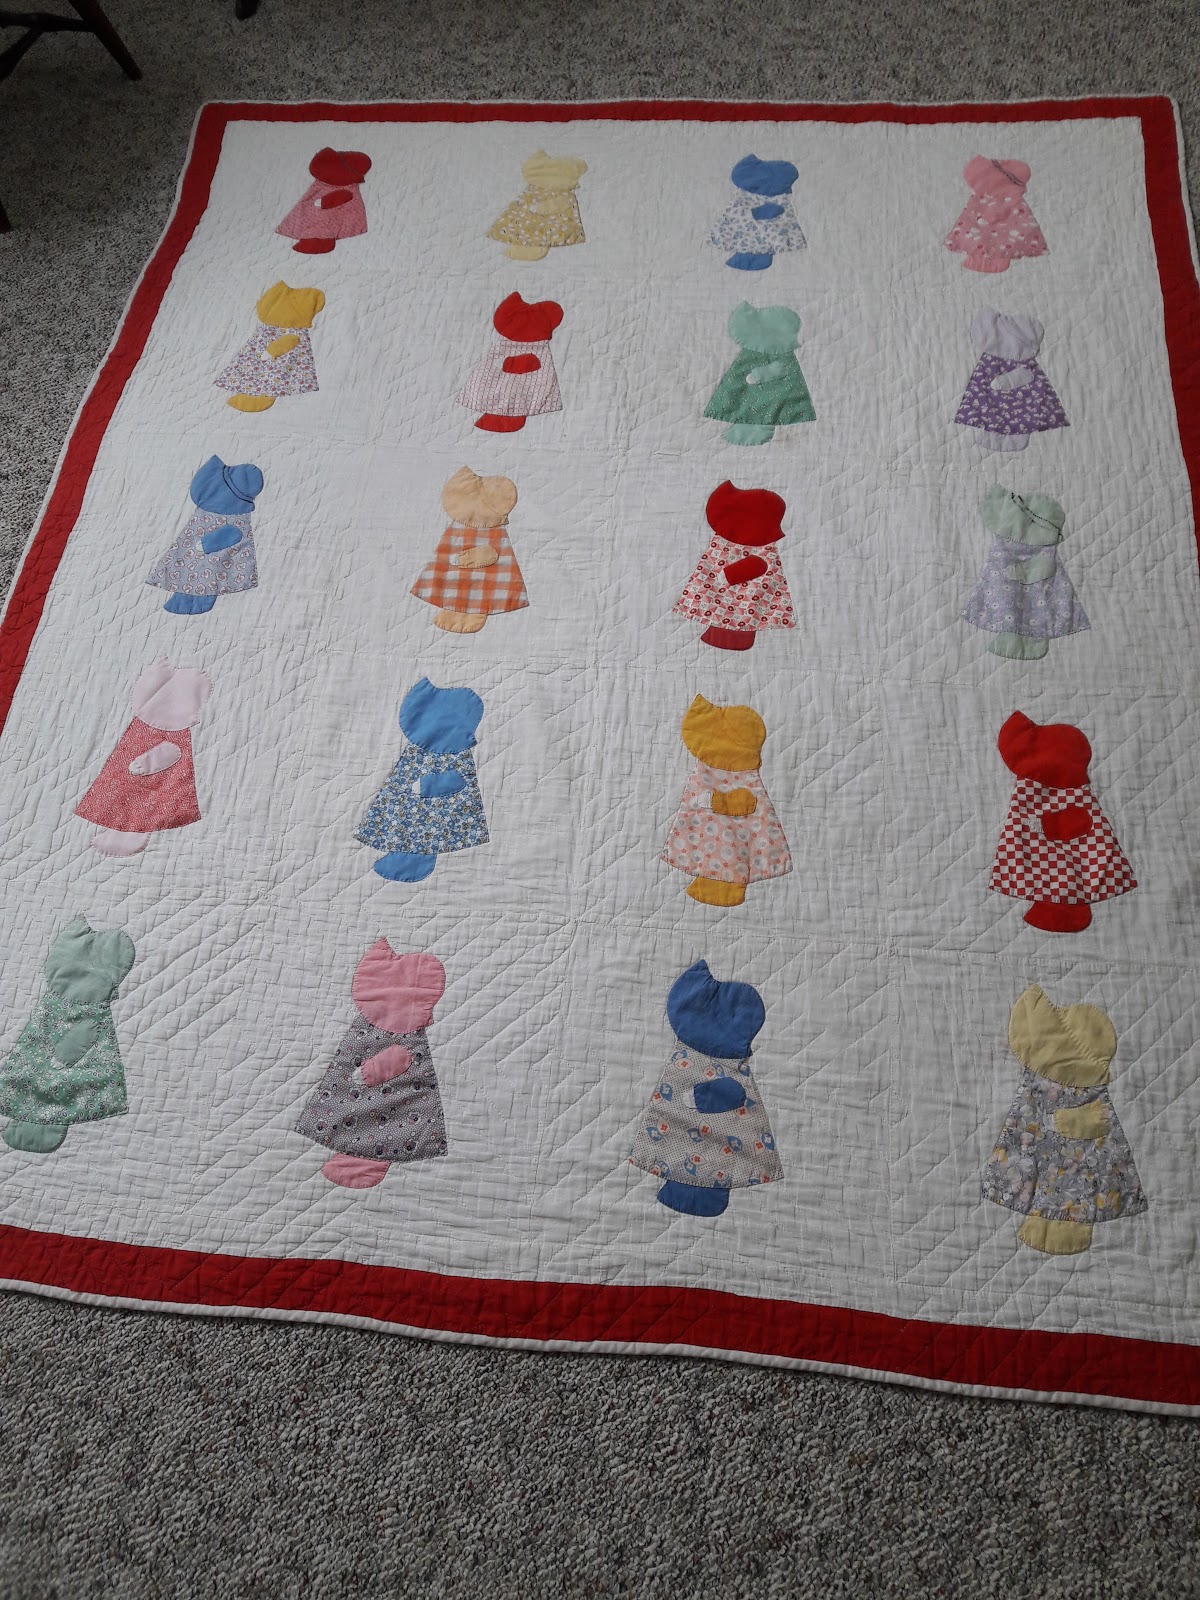
Summarily, out of 20 Sunbonnet Sues, 11 were partially or completely replaced. And now for her new and improved debut...

I would never recommend her to be washed or used other than for display purposes. Much of the background fabric is thin and nearly worn through. That repair is beyond my abilities.
My recordings here are just part of her long history. I hope I have given her many more years of enjoyment. She can be laid out over a spare bed for display. This is the best option as long as she is out of direct sunlight because there is less stress on the fibers.

And she can be carefully folded at the foot of the bed as display too.

It been a pleasant time restoring this quilt back into some use. Many thoughts and ponderings were entertained as I thought of the ladies who made these charming blocks. Who were they? What were their families like being raised in that small town? What trials were they facing? We can only guess, but I imagine they weren't far from our own daily concerns and worries of today.
And that is one reason we sew, isn't it? There is a therapeutic effect in the monotony of sewing with needle and thread. Many thoughts and prayers are exercised there.
Would you like your own copy of this pattern? You can download it here. Please contact me if you do reproduce this quilt with your own creativity and share the results. I would love to hear about how you tackled this pattern and if you had any problems. This is really a simple and fun pattern with so many variations.
Happy stitches!

As you can see, she was in great need of repair.

I painstakingly removed the old, frayed pieces and traced with tissue paper the better parts of Sue for making new patterns. Pictured below you can see the worn condition of some of these Sues. (clicking on any picture will enlarge it for better viewing)

And take note of the tiny stitches used to "applique". I have not seen a running stitch as a method of applique before. But it works, and maybe I will try this method in the future on some of my quilts. It is certainly a faster technique than the traditional needle turn method.

After tracing on tissue paper, I carefully glued these tracings onto heavy paper. Once dry, I cut them out to size. Dresses, bonnets, shoes, sleeves and hands were made. When tracing these new pieces onto fabric, I would remember to add seam allowances when cutting them out because these paper patterns were of the exact size.

More than a few evenings were spent turning under raw edges and basting to prepare for applique. This method works best for me and I also have the benefit of laying them over the originals as a final measure that would ensure I got the size and placement correct.
My main goal was to make my footprint, or should I say, handprint small in working on this quilt. I used 30's era fabrics of the same colors of the original Sues, and only replaced what was absolutely needed to be replaced. Many of the fabrics were beyond hope (frayed, deteriorated, and/or missing).

She had a black embroidered band on her bonnet which I removed from most of the Sues because they were badly worn and frayed. I tried to leave a few that were in the best condition as an example of what was there.
Total stats were as follows:
Four Sues were completely replaced. (Bonnet, dress, sleeves, hand and foot)
 |
 |
 |
 |
 |
 |
 |
 |
 |
 |
 |
Summarily, out of 20 Sunbonnet Sues, 11 were partially or completely replaced. And now for her new and improved debut...
I would never recommend her to be washed or used other than for display purposes. Much of the background fabric is thin and nearly worn through. That repair is beyond my abilities.
My recordings here are just part of her long history. I hope I have given her many more years of enjoyment. She can be laid out over a spare bed for display. This is the best option as long as she is out of direct sunlight because there is less stress on the fibers.

And she can be carefully folded at the foot of the bed as display too.

It been a pleasant time restoring this quilt back into some use. Many thoughts and ponderings were entertained as I thought of the ladies who made these charming blocks. Who were they? What were their families like being raised in that small town? What trials were they facing? We can only guess, but I imagine they weren't far from our own daily concerns and worries of today.
And that is one reason we sew, isn't it? There is a therapeutic effect in the monotony of sewing with needle and thread. Many thoughts and prayers are exercised there.
Would you like your own copy of this pattern? You can download it here. Please contact me if you do reproduce this quilt with your own creativity and share the results. I would love to hear about how you tackled this pattern and if you had any problems. This is really a simple and fun pattern with so many variations.
Happy stitches!
Subscribe to:
Posts (Atom)