Wednesday, November 8, 2023

Vintage Column Quilt Finished

I had so much fun in the making of this scrappy quilt. And did I ever use up the 2" squares in my scrap box! It is nearly empty as you can see! Just the "uglies" are left.

This quilt was originally featured on Jo's Country Junction website. I went as far back as 2017 trying to find the direct link but was unable to locate it. There was some discussion about this quilt on the Stashbusters' group list as I couldn't quite get my head around the actual block. Nancie V was so very helpful by sketching a block for us. Thank you, Nancie! This quilt is credited to you! Here are my expanded sketchings and scratchings.


Once the blocks were made,  I debated on the setting for this quilt. I considered just a straight layout - the easy way. But after a brief break away from it, I decided to just go "all-in" and make it on a diagonal setting. Which meant MORE blocks (setting triangles) that needed to be made and the trimming on the edges had to be done. 


Notice my garlic knot blocks on the right...another project that I am anxious to get finished. (2024 goal)


You can see the partial blocks that were needed on the outside edges, and if you look at my "cheater" sketches above you will find their actual layout. It got confusing so I needed to stay close to those drawings. 


Then it was time to consider the borders. I had yardage leftover (still do) so I went with the Thimbleberries pansy print that was also used in the diagonal centers. 


Once it came home from my long arm quilter, it was time to wrestle this big quilt on my machine and sew on the binding. More of that pansy print fabric.


Which brings me to the most relaxing part of making a quilt - hand sewing the binding on. Ahhh. These chilly nights have been nice to sit under this quilt and sew in the evenings. 


So now she is finished. The binding and label is on (using 1/2" squares) and is ready to put on our bed for winter coziness. 

So many scraps that recall past quilts and projects.  I calculated the total squares when determining the total yardage. There were 3,280 squares in the making of this quilt. (2500 in 25 blocks + 660 squares in setting triangles + 120 squares in corners = 3,280). Phew! That is a lot of fabric squares!


The completed measurement is  94" x 94" and I used up 17 yards of stash. That brings my total to 104 yards of fabric used so far this year and this is my 10th finish! It has been a good year.

 ________________________________


Meanwhile, I pin basted my Dear Jane Siggies quilt at the church a few weeks ago and now I am able to hand quilt it at my chair in the evenings. It is so enjoyable to devise different ways to quilt each little signature block. At first I had it in a hoop to quilt but had to take it off and quilt it without stretching (relying on those pins to do the job). My hands just cannot work that hard anymore.

This one will take me a long while. I may have to set it aside as I try to catch up on my Jaye's Bouquet BOM as I am falling behind. And then there is the Maymont on my design wall waiting for its rows to be sewn together. It is sometimes nice to have a few things going on at the same time. Do you work like that too? 

 _________________________________


Another finish to celebrate is the final work of using up this years apple crop. I tried my hand at making apple butter. It took 3 days of cooking!! First day was just cooking them down  S-L-O-W-L-Y.  For effect, when someone asks you how to make apple butter, you are supposed to delay your response to prove they have the patience! Haa! Day two after pureeing in the blender, I cooked it down some more. And day three was just to bring it back up to a simmer so I could process it in jars. Each day I refrigerated it overnight for fear of scotching it. Today's crock pots still cook it too fast. During the day I constantly stirred it and it finished beautifully. 


This is so good on toast and biscuits. And mixed with cream cheese makes an excellent spread on bagels. There are more recipes on what you can do with apple butter - pies, cakes, breads...


And keeping with the theme for this year - downsizing and thinning out the stuff in our house - I donated 3 quilts and 5 table toppers at a benefit auction last week.


No idea how many yards of fabric those included. Just happy they found new homes where they will hopefully give warmth and comfort as quilts always do.


Are you still here? We recently went to a Justin Hayward concert. Nothing like hearing the music of our youth. It was an enjoyable evening.


Happy stitching!


Wednesday, September 27, 2023

STILL Harvesting and Reporting a Churn Dash Finish

   I used to think that May was a busy month. September is proving to be a close second - perhaps even beating it. This year we had a big crop of apples. We must have picked 5 bushels already and there are more on the trees waiting for a frost to ripen them. I am not complaining though. It has been 7 years since we last got a harvest of apples, so this is a good thing!

Above are the washed apples after wrapping the "perfect" (unblemished) apples...

They are being stored in 4 boxes in our basement, and are individually wrapped in tissue paper so the skins do not touch one another. These are Cortland and Liberty apples and should keep for a month or two or, (hopefully) more. I will be checking these weekly for any that have gone bad. Because you know what they say about one bad apple!  


I tried my hand at making apple jelly WITHOUT pectin. Yikes! It reached the jelly stage faster than I could get it off the stove. Just look at those air bubbles. I now know what "sliding off a spoon in a sheet" looks like. Nice try anyway. I put these 2 jars in the frig to use up right away and one is already consumed! They are so good!


I cut up more apples and tried another batch using sure-jell. It worked nicely this time. I also had one cup of elderberry juice leftover from making elderberry jelly last month, and added it to 5 cups of apple juice. Oh my! I have a new favorite jelly! It is delicious and such a pretty color! You should see it on toast. ♥ Here you see them resting besides the second attempt at apple jelly on the left.

And there are STILL more apples to process! I peeled and sliced 18 cups to make pie filling for the freezer. It made 5 quarts and enough leftover to make a pie. 


The downside is I didn't really like the filling that much. I'd rather use fresh apples for pies. But its done, and perhaps we can make cobblers and crisp from those frozen 5 quarts.

Of course there were also tomatoes to deal with. I only planted 6 plants this year and I got nearly 10 quarts of sauce along with fresh eating all summer. Not too bad I guess...except all the Big Farmer wives are laughing at my measly attempts at canning! My mom used to brag that she put up 40 quarts of green beans one year when she was on the farm!

I froze 10 quarts like pictured here with the elderberry jelly.  Freezing green beans is not nearly the work of processing them in a hot water bath like mom did, I am sure.

So I am longing for the long days of sewing in the sewing room. In the meantime, I am gathering and saving seeds for next year, and plugging away at reducing the amount of "stuff" we own. Are you minimizing too?


A big shout out to Gerdy and Dot for their fine work of finally laying some eggs! Dot, our Starlight green-egger laid the pretty one on the lower left. Gerdy, laid the small one on the right - even though this picture doesn't not truly represent how much smaller they are than the top two. Gerdy's is not green or blue, but it is textured. Its almost like a fine mesh was wrapped around it. They are both delicious, and we thank them all daily for their hard work!


Well, if you stayed with me this long, I will share my latest finish. I wrote about my red churn dash quilt in July. I fussed about the borders, and making do, and purchasing binding fabric on ebay. She is all done now and I am pleased with the outcome.


Its finished size measures 78" 87". I love reds and this is now one of my favorites. It will keep us warm all winter.


The churn dash quilt block really is a charming block. One that makes any quilter happy to construct. If I ever get caught up with my other ongoing projects, I would definitely consider making another. Maybe try the 3 1/2" block as linked below.  I am sure there is a way to turn this block into a leader/ender project if the pieces were cut out before-hand. 

This quilt began in 2019 when Temecula Quilt Company began a fun sew along called Dashing Through the Snow


These 6" blocks (finished size) use 2 red 2 7/8" squares, 2 light 2 7/8" squares, and 1 light 2 1/2" square. 2 strips cut 1 1/2" x 10 1/2" - one light, one red. You can visit Temecula's site for construction directions if you need them. Her blocks finish at 3 1/2". So darn cute!!


I had 3 extra blocks leftover so I used them in the label on the back (to be signed and dated). The block in the middle is done by simply rotating the strip units so the light is next to the center light square.

I calculated the border fabric (3 yards), fabric for the 104 churn dash blocks (5 yards), 1/2 yard binding, and 5 1/2 yards backing. This brings the total to 14 yards. 

This is my 9th finish and I have used up 87 yards of stash so far this year. Should I add the yardage I bought at the Ohio Shop Hop? WelI, I did purchase a total of 4 yards in remnants and, ah-oh, a kit!! I couldn't resist. It was the last one and deeply discounted. I will have to cut into it before the end of the year to claim it in next year's UFO count. 


Did anyone go on the All Ohio Shop Hop? I understnad there are similar shop hops in several states. Is your state participating? More are joining in 2024. Check out the dates and lists here.

I visited a few shops with great restraint. I have enough fabrics, patterns, notions, etc., to keep me busy, but a couple of friends asked me to join them for a day of shop hopping and lunch. It was more like "shop till you drop". Sheesh, I came home sooo tired! Along the way I found this cute idea to use the little blocks that each shop gifted us hoppers with. 

I hit a total of 11 quilt shops. Not even a fraction of all those participating state wide. So, see? I did practice restraint. Ha! I actually heard there were some quilters who book hotels and hit them all! Can you imagine?


Bosco loves pulling his toys up as a pillow and napping on them. He is still very much a puppy even though his first birthday was in August. He even self sooths by  sucking on his toy's appendage. He cracks me up. And you know he is relaxed when his tail unfurls.


See you next month. Happy stitching!

Kris


Monday, August 28, 2023

Harvesting Garden, and Finishing a Big Quilt

Fall is in the air. Can you feel it too? We've been getting a few cooler days and nights (but still mostly hot), the shadows are getting longer, and I don't hear as many songbirds singing these days. The tomatoes are ripening and I have been putting them in the food dehydrator. Our green beans are in need of picking every 2 days and they are filling up the freezer. Garlic is dried and braided for storage. And now the apples are nearing the time for picking. We are so excited because this is the first crop we have had in 2 years.  And the chickens are excited to eat the apple scraps!


These are our new girls, Gerdy and Dot. They are Starlight Green Eggers, although Gerdy has feathered legs and feet. We are wondering if she didn't get mixed in with the Starlight chicks at the hatchery.

Its no matter. We love little Gerdy anyway. She follows us around the chicken yard and talks to us. At night, after everyone has found their place on the roost in the coop, there stands Gerdy outside waiting for one of us to pick her up and place her on the roost. ♥

They should begin laying any week now as Gerdy and Dot are 20 weeks old.

This year's sunflowers are so very tall! I always thought sunflowers grew on a single stalk but mine seem to branch out like trees. The chickens love eating the seeds so in order for them to have a supply, we have to pick them once they mature before the birds eat them all.


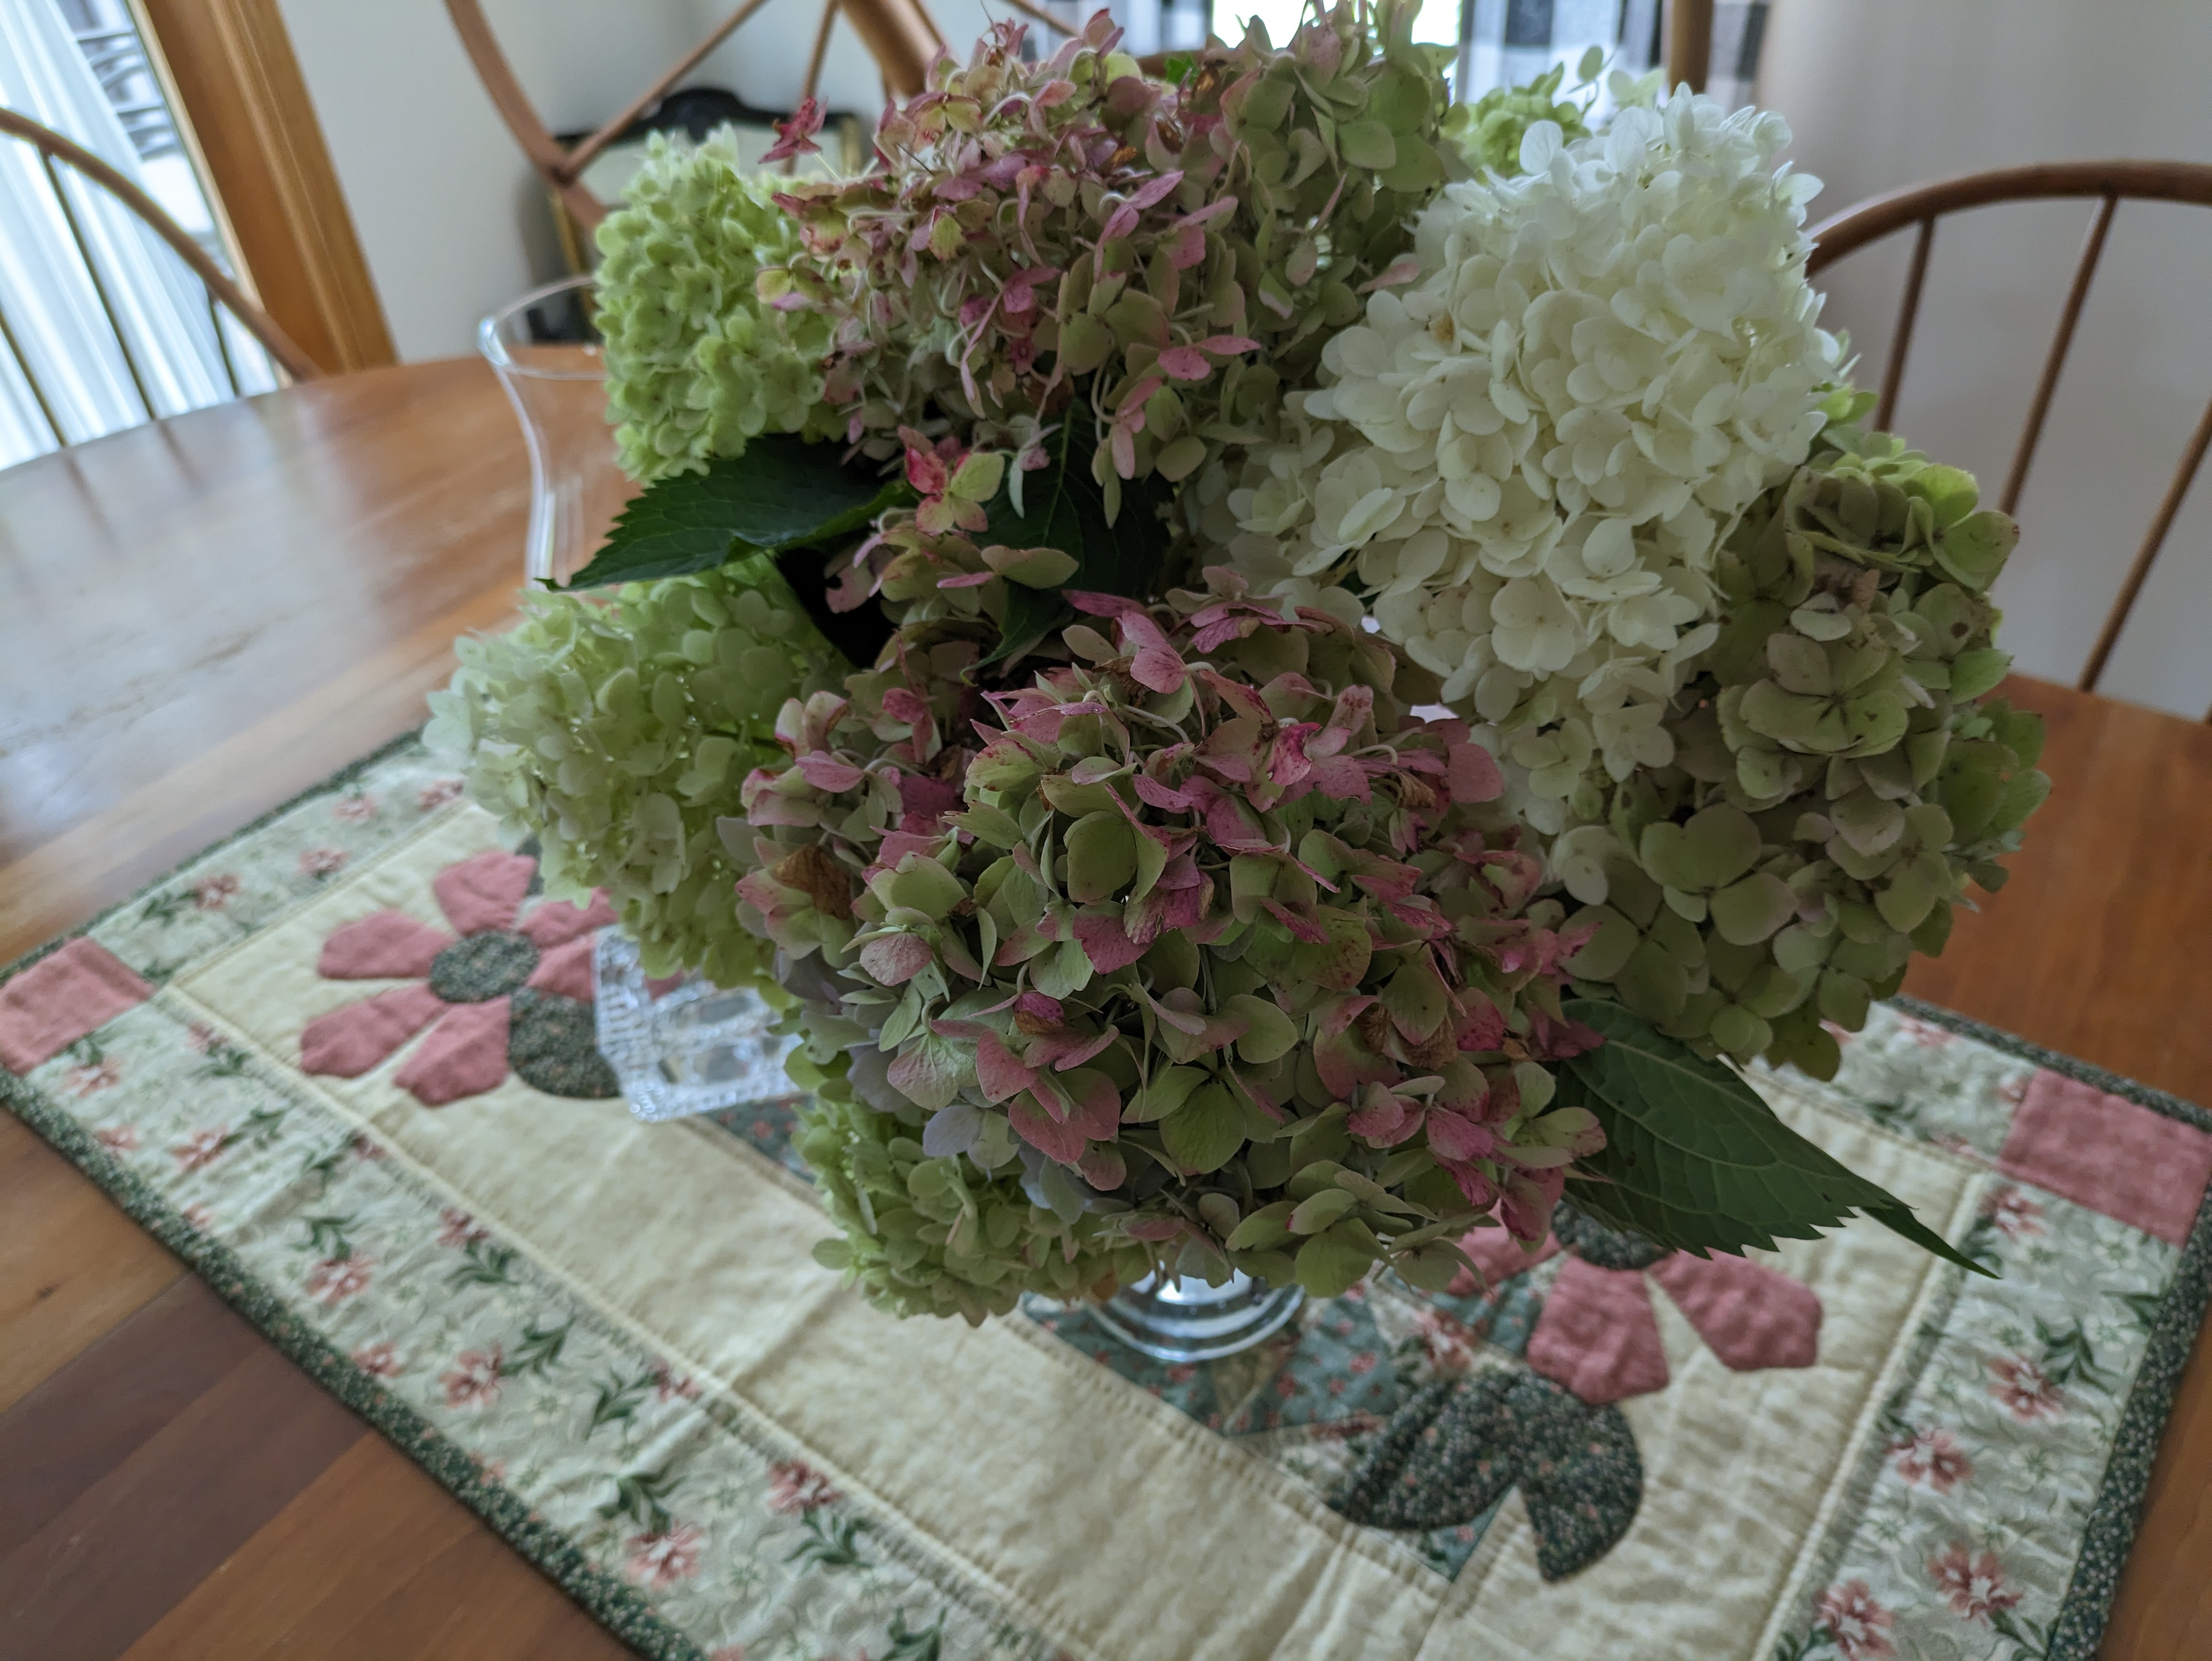
Our daughter gifted me with some hydrangeas from her garden recently. My Thimbleberries table-topper came out as a perfect companion to these hydrangea colors on the dining table. Fresh flowers are such a cheerful addition to a room.


They are not only aesthetically pleasing, but also soothe our mental well-being and add to our creativity. All are things I like a supply of, along with the memory of our family dinner when these were presented.

 ______________

So, in between all the work outside, and in the kitchen, I have managed to complete another quilt. This one was started many years ago as a Block of the Month club at a local quilt shop. The patterns were Moda University blocks and once you completed all 12, you got the finish directions.


I changed up my setting (added some diagonal pinwheels and an extra block), and added some borders to make it a bit larger. Larger indeed! This quilt finished at 98" x 98"! 


It is done in greens, golds, and browns. Pretty colors for the time it was being made. I used all Fig Tree fabrics and love the golden pear patterned fabric. 


There are lots of fabrics left over - even after those large borders, and lots and lots of leftover HSTs too. So much so that I have enough for another quilt. I reserved a few for the patchwork label.


The rest of those pieces will likely go in the procrastination box. Hmm, remember the Procrastination Box? I need to take another look in there. There is always some fun, quick project waiting to be created with the leftover pieces from previous quilt projects. And it is growing in size!


This Green and Gold Moda University Sampler Quilt has been sitting so long to be finished. It feels good to call it done.

It is hard to capture a nice photo on a breezy day. 


The back shows the all-over quilting design.


A close-up of the quilting. It is called Lorilee.
 
The picture below shows how big it is on a double bed. The browns are reddish which compliments the redpaint commode and cherry bed. The greens work with the walls and plants. And the gold matches the tiger painting on the wall. It is painted on silk and was brought back from occupied Japan after the war by my father-in-law.


After making some calculations...I have found it totals 18 yards - including the backing and binding. I definitely busted some stash with this one and my total for the year is now 73 yards.


I have another large quilt needing its binding sewn on so hopefully I will get that one announced soon. I need to come up with a name for it also. I will share more information and history on my next post.

I am still working on my embroidery blocks for Jaye's Bouquet BOM and trying to keep up. This month's featured flower was a Zinnia. Floss colors used were lovely oranges and a pretty silver green for the stems. A simple chain stitch and fly stitch (my favorite!) is needed on the borders and this block is finished. Is there anyone else working on this BOM too? I am having a lot of fun brushing up on my embroidery skills.


Anxious to finish this block so I can wrap it on the "embroidery noodle" and move on to the next.

_____________

Bosco had his first birthday this month. Happy Birthday, Bosco!


We all went to the Dairy Queen for ice cream. Here he is waiting for Dad to come back with his treat. He never came up for air until he finished his little dish! Haaaa! Next month we hope to book a date with Duke's K9 Dash n' Splash for some dock diving training. Doesn't that sound like fun? Can't wait to see this brave little dog go for the big plunge!


I'll leave you with a quote I found. Perhaps you can tell me who the author is.

"My soul is fed with needle and thread."


Happy stitching!


Wednesday, July 19, 2023

Keeping Up with Kori with Summer Sewing & Gardening


It is the HOT season now and I am taking advantage of staying indoors where I can sew. But first a little garden update: We have been getting rain every couple of days so the garden is thriving in this heat and so are the bees. They have been busy making new comb, the queen is laying lots of eggs and larva, and the workers are consuming their sugar water as if they are starving. We, the Bee Fairies, go out at night and change the jars with filled jars while they sleep so not to disturb them unnecessarily. And not get stung!

Bee Garden

The surrounding wildflowers are growing but I am now unable to get in there and weed, so it is what it is. The bees don't seem to mind. I am anxious to see the floral display and will share a picture soon. I did manage to snap a quick picture of some volunteer Forget-Me-Nots that seeded last year. They are bi-annuals and one of the few flowers you can find that are true blue. So pretty!

Forget-Me-Nots in the Bee Garden


I mentioned in previous posts that I signed up for Kori-Turner's sew along. I have fallen behind in the making of Jaye's Bouquet quilt but have not given up (in other words, packed it up in a box as a future UFO). The present block I am embroidering is Block #2 featuring ...ta da... Forget-Me-Nots! That's good timing, right? This block is working up nicely. I traced the forget-me-nots pattern sheet by taping it to a bright window, then taping my fabric over the design to be traced. My own take on a lightbox. What is your favorite technique?

Kori recommends using a pigma pen to trace the design on the fabric. I am afraid of an unsteady hand and making a mark that I shouldn't so I am using a pencil. But next time I will use a harder lead pencil for finer lines. 

Window Tracing


Another tip of Kori's that I did not follow is using interfacing behind the stitch work area. My mother always taught me to keep my work as neat on the back as on the front. You can work over your thread tails in the beginning of each loaded needle and again "weave" the ending thread through your completed work before cutting off. Look good? No knots and unsightly thread moving between the flowers. Mom would be pleased.


back of embroidered work

The Forget-Me-Nots are embroidered using a combination of chain stitches and back stitches using two strands of floss. Simple emough. I love the little daisy stitches on each petal, don't you? Another tip my mother taught me was to use only one stand of floss and make your stitches tiny! This is the technique I chose for the flower centers. The French knots will be made using Sue Spargo's wool blend WonderFil Ellana

Forget-Me-Nots work shown in front

I have not made any of the quilt blocks for this project yet. I figured the embroidery blocks were more labor intensive and wanted to get those completed first. The quilt blocks are simple, yet charming, and they lend themselves to some embroidery embellishments also. I'm still considering that while this is turning out to be a really fun project.

Let me mention the little "tool" I made for my completed embroidered blocks. This Noodle Embroidery Wrap was a kit found in Kori's shop but you can make your own. It is a pool noodle cut to your desired length, and covered with a piece of fabric. You can embellish it with embroidery stitches but I just used a blind stitch.  What I did do differently was I made 2 yo-yos and sewed them to each end to hide the pleats. Now instead of folding my embroidered blocks (a no-no) I can simply store them by rolling them on the noodle wrap. No more fold lines! Nice, right? 

Noodle Embroidery Wrap


Meanwhile, in the sewing room I have been working on my red Churn Dash quilt. These charming little 6" blocks have been in the works by my sewing table for the last 2 years, I think. They were a sew along at Temecula during Christmas of that year. Did you participate?


6 inch churn dash

I chose a different setting after finding a pretty border fabric by Maywood Studios at our local quilt shop that was closing last spring. There was only 2 1/2 yards so I had to hold my breath that I had enough!


leftover pieces

Leftover pieces.


My original plan was to have the black borders run in the center and 4 sides, but there was not enough of those black borders.

churn dash with black center strip


I considered using the narrow "half strip" that ran on the selvage but...nah! Too much "make do". (see above). So I picked out all those stitches (very carefully) to remove the center. VERY carefully!


picking out the stitches

I then used that center black border as the final bottom border instead.

final display

It is better on the eyes now, don't you agree? I added a soft green 2" border so my longarm quilter would have more of a seam allowance on the edges to work with. Look how close it was (below). I could count the threads! Probably because I tore the strips to ensure they were perfectly straight. Unfortunately when you do tear fabric, it "bruises" the edges but I was willing to accept that for the true grain and straight edge.

so little seam allowance

And I purchased a 2/3 yard remnant of a black floral from this Maywood Studios line so it is being reserved for the binding. (lucky me to find this piece!) Presently, this quilt top (flimsey) has been delivered to my LAQ (along with Abby's finished Dogs and Cat quilt top - see last post) and I expect them back in a few weeks. My Churn Dash quilt will be pretty on our bed this Christmas. And Abby's Dogs and Cat quilt will hang at the Geauga County Fair this year. Hope she wins some recognition!


And I hope you are enjoying your time in your sewing room too. 

Happy stitching!