Thursday, June 30, 2022

June Is Blooming with Finishes

Walking past this Wisteria smells amazing! The bees like it too. So the weather is really warm (hot), the gardens are growing, and the sewing room has been busy.

My last post I shared about making a quilt top out of old pajamas that belonged to my late and great dad. These remnants have been stored away since 1990 and I recently felt motivated to dig them out and cut into them.


 An improvised jellyroll race was decided upon and the strips were cut into 3 1/2" strips. 


I hand-quilted this top which was not too bad of a task because it only measures 48" x 61".  I used up an old spool of hand quilting, all cotton thread. It is nice to work with as it doesn't knot up like other threads tend to do. I love the soft finish that hand quilting makes. This will definitely be a cuddle throw quilt. 


I am pleasantly pleased with the end result. I wasn't sure about the colors but that is what makes a jellyroll race quilt project fun. You are anxious to see how it all goes together in the end. 


So this was a fun finish. It is now labeled and ready to gift to my sister in Florida. 

This project busted a total of 5 1/2 yards of stash.

-----------------------------------------

Another quilt that I can call a finish is my Hexagon Flower Quilt. Oh how I love this quilt! I loved sewing these little hexagons together. They were like potato chips - I just couldn't stop! And when I found the striped fabric at the LQS's shop hop I knew it would be a perfect pick for the border and binding. Phew! I just had enough too! And because I purchased it 4 years ago, there was no chance of there being more. Have you made this same mistake? It makes you hold your breath, right?


The Hexagon Flower Quilt was part of a stitch along at Kingfisher's in 2018. I like the Flowers for Eleni too as they are appliqued onto squares instead of diamonds. So if you would like to make this yourself, you could choose either block design. The hexagons were 1" and I got my free templates here.   You can read a tutorial on how to make these English Paper Piecing hexagons at Apple Green Cottage along with links to free templates.


I really enjoyed arranging these blocks, mixing and shuffling so they complimented each other. 


Do you recognize any of these fabrics? I really raided the scrap bin and a few fat quarters.


So happy to have this one done. It measures 80 1/2" x 83 1/2", and I busted through 13 yards of stash. It will be on the bed for the summer. I love how colorful and cheerful it is.


Happy stitching!


Wednesday, June 1, 2022

Jelly Roll Race in Pajamas

Have you ever tried making a jelly roll race quilt? They are fast, fun, and always create lots of anticipation and excitement because you are never quite sure how it will look when finished. 

What was left over

I recently found a bundle of fabrics that I had saved many years ago after my dad passed away in 1990. I gathered up his old pajamas and cut them up for a future quilt. Yes, Bonnie, you were not the first to recycle and repurpose old clothes. :-) 


I began by pressing these "parts" and then I cut them into 3.5" strips. Hmmm, perhaps I will sew together diagonally into rectangles and frame with a solid fabric, I thought. No, I want to make this quilt quickly and send it off to my sister who recently lost her husband. I thought this would make a nice hug for her, and I am sure she will recognize some of these fabrics as she was Dad's caregiver for a while. 


So I just began sewing into one long string. Some were sewn on the diagonal, and some were just butted together. Lots and lots of sewing and guessing about when there was "enough". This is where once you begin, it is hard to stop until finished because you just can't wait to see it finished into a top!


Mine finished at 46" x 61". A perfect size to cuddle under. 


But these fabrics are sooooo thin! I found batting pieces that I zigzagged together to make a "frankenbatt". And another find was some yardage in complimentary blues and browns. It is now a sandwich ready to quilt! I mention the thinness of these pajama fabrics (which are also poly-blends) because the batting I found is working nicely together with those thin fabrics and is making an unbelievably soft quilt! I think the batting is from leftover Soft & Toasty by Fairfield. It is a natural cotton, and soft because it doesn't have a scrim. I will have to quilt closely though. 2" to 4" quilting distance is recommended. 


So stay tuned for the finish. I have been quilting on it during the evenings and expect its completion soon. So anxious to get this in the mail headed for Florida!

So you want to try this technique yourself? Here is a link for instructions from Wee Folk Art. You can find lots of links to YouTube videos also with a simple search using your favorite search engine.  

This is my third "jelly roll race" quilt sewing strips together. I have not used a jelly roll but sorted strips from my stash. One I dearly love. It is made using low volume fabrics (simple backgrounds) and a few red and yellowish squares randomly. It was hand-quilted, and is so soft and cuddly. Maybe that is the key component - hand-quilting. Your thoughts?


Another jelly roll race project I worked on was one that I used brown and blue strips. Once it was sewn together, I was not that happy with the ending result. It hung out for a while in the closet until inspiration hit.


Then one day, I bravely cut into it and added these "positive" marks in a row vertically. I think I like it better now, even though it is still hanging out in the closet to be quilted. (grin)

So while I am see-sawing my needle through the pajama quilt in the evenings, I am also working on my "siggie" blocks getting them made into a top. You can see them peeking out behind the pajama top pictured.


I am very anxious to see this one finished to the flimsy stage so I can send it off to the long-arm quilter. Not too sure she will accept it though as it has embellishments of buttons, etc.

If not, I will be on the floor again, stretching and pinning to prepare for hand quilting. Sheesh, it is getting harder to do down there. 


I once saw a demo where you can load the backing, then the batting, and finally the top onto the rails of the quilting frame. Anyone have any luck trying it this way? I imagine you must carefully rolls these together so there are no puckers. Perhaps YouTube has a video....

Happy Summer stitching!


Sunday, April 24, 2022

No Diamonds and No "Y" Seams

This was such a fun Bethlehem Star/Carpenter Star quilt to make, and it used no diamonds but half square triangle units and background squares. 


I have always wanted to tackle this pattern and this version surely made it possible with no puckers in the center. I highly recommend this pattern by Debbie Maddy at Calico Carriage.


It finished very large at 98" X 108" and I went through 20.75 yards of stash! It was my last quilt to be quilted by my dear friend and long-arm quilter, Wendy. Happy retirement, Wendy!


The original top was made probably 12 years ago (?) at a workshop with the ladies at Material Girls. It has been so long in fact, that I cannot remember why I added the extra solid black border on one end. I usually am satisfied with square quilts so what was I thinking? But I do remember the many varieties that were constructed that weekend. It is always fun to sew in a group.


I made a label for the back with leftover solids and prints. I decided to hand-sew a lemoyne star as that seems appropriate. It is appliqued on the back and then I quilt through several layers carefully so not to have those stitches show on the front. I'll sign and date it soon after posting this.


I am so happy to have mine quilted and finished. I wish I took more pictures while it was being made. Perhaps that is a good excuse to make another! I love these giant stars. If you are interested in making one yourself, the pattern may still be available. And Lindlee at Plains & Pine offers some beautiful large star patterns.  (I am not an affiliate. Just passing on info that may be useful).


Happy Spring! Everything on the homestead is waking up and beginning to bloom. We get our bees soon so we will be busy tending to the hives and planting the garden. I love this time of year, even though it takes me out of the sewing room. Hope you are making progress towards your goals.


Happy stitching!


Monday, March 28, 2022

Sewing 3 Yard Quilts

I always wanted to try these cute and speedy patterns using only 3 yards of 3 different fabrics. I downloaded a couple of patterns online (see below) and made some quickie projects for this year's Santa Shop. They are all in need of being quilted and I will tackle that job later this summer. But for now, it feels good to have some of those juvenile prints off my shelf and made into something special.


The first one was simply a Rail Fence project. The free pattern is So Sweet by Wood Valley Designs.  I love these bright greens and reds together. I went off the general plan to use up what was left of these fabrics to make the unusual borders. It measures 47" x 47" so far (unquilted).


Another child's quilt was made with this same pattern using some Richard Scary fabrics. It finished a little bigger at 50" x 54.5".


I had a nice group of navy blue and gray fabrics so I used Fabric Cafe's 3-yard quilt pattern, Boomerang. (no longer a free pattern) I loved the feel of these fabrics and the quilt top turned out lovely. Perhaps it will make a nice throw on someone's couch. It measures 43" x 58".


For the kitty lover, I made an orange, yellow, teal, and purple top using the pattern, Strip Happy by Fabric Cafe. I improvised by adding the teal and purple sashings to break it up a bit. It is really bright and measures 44" x 59".


And lastly, I made a purple and bright green top using Fabric Cafe's pattern, Simply Blocks. It is nearly finished to a flimsy stage. I only have the borders to sew on and will be done by the end of this month so I can claim 5 small quilt tops completed.


Not my best pictures, nor my best post, but I tried to show that I have been busy making some progress with a group of fabrics that needed to be used up. 

I clipped little leftover pieces from each quilt and sewed them onto a slip of paper with measurements written on each. I seem to have misplaced a couple examples. This does not surprise me as these projects have given me much grief throughout the whole month. That is another story for another time...


These were taken to the fabric shop to buy backings. Sure, I could have "made do" with fabrics from my stash, but because these are gifts, I wanted the backs to compliment the top. 

I found a few remnants at sale prices. One was a bright green remnant of fleece that would make the red and green top extra cuddly. I am quite fearful of using this as a backing, but heard that it works, so I will reserve this project for a time when I have a lot of patience. (very big grin) Or perhaps send it out to be quilted.

I also purchased some flannel that might prove a little easier to handle through the machine if I use a lot of extra pins. 

These will all be tackled at a later date. Anxious to get back to my original plan of finishing some other projects that are waiting to be completed.  Stay tuned!

Happy stitching!


Friday, February 18, 2022

February is for the Birds

 The Great Backyard Bird Count, that is. It is not too late to jump in and they have some great apps to help you. This is my first year participating.  I have been wanting to do this for years, but I would seem to think of it only after it was over. So this year I am excited to be on time and having fun with it. You can check it out here.

https://www.birdcount.org/

- - - - - - - - - - 

I have been very busy in the sewing room, and also have a quilt to claim as a finish. This quilt is my "ugly" quilt. Made of fabrics from the bottom of the barrel, so to say. My goal was to simply make a utilitarian quilt that would take a lot of use and laundering, and use up some scraps that were very near disposal status. Perhaps you can spot some "oldies" in there. That little fruit print I can remember from my early quilting days in 1982 (?). I can even remember the little quilt shop I purchased it at. 


I had an old blanket that I had saved just for the purpose of using in such a quilt as this. It was not a heavy blanket. It was the kind that was popular in the 60s and 70s and had the satin binding on both ends. They remind me of quilt batting, but with a heavy layer of scrim. Maybe that is how they were made, I do not know, but decided to use it here. Does anyone have any background to these types of blankets?


I made a pieced backing with some yardage fabrics I had saved. Although I first thought I would just tie this quilt, I decided to hand quilt it using pearl cotton and a big quilt stitch. I used a roll of variegated thread just to "use it up". So this quilt truly does have all the markings of a utilitarian quilt. A make-do project for sure. 


Pin basting on the floor will soon be a task that I will have to give up on. So hard on the knees and hips, right? It is presently on our bed and is rather heavy. But really warm and that is a cover we can appreciate. 


I did not do a lot of quilting on this quilt. In the ditch, and some diagonals on each block. We will see how well she launders. I may have to go back and add some more later, but I hope not.

It measures 90" x 90". The blanket was 84" x 93" so I sewed on an additional 9" to the short side to square it up with a leftover piece of warm and natural batting. Total stash yardage busted was 17 yards which includes the 5 yards for the backing.


- - - - - - 


Sew the Scrap Out of March is coming up soon. What will you be working on? Pat Sloan has a sew along.  Actually,  she is calling it her String Bean Challenge. I love the thought of sew up a bunch of scraps and strips. I surely have a lot of them. 

I recently purchased a couple of patterns from Karen Griska. On my! I am so glad I did! I love her simple designs that sew together quickly and use up a lot of leftover scraps. I will be posting again about my progress. I am trying to get my supply of strip/strings reduced by half this year. 

Hope you are sewing up a finish or two in your sewing room. We have been getting some snowy, cold, winter days here. 

Happy stitching!


Monday, January 31, 2022

Can You Sew Like the Wind?

I have heard this expression and it always draws pictures in my mind of a humming sewing machine singing peace and calm as things just go together with ease and speed. Add an interesting audio book to the mix and it is contentment with bliss. Ok,... so that is my feeble attempt at poetic expression, but I have been "sewing like the wind" this month and have 3 projects brought to the flimsy stage! Yes, that is three!
First was my Merry Mayhem New Year's Mystery from 2018 (?), case #140. I fell in love with this block and decided to make more than was required for her mystery quilt project. I had these pieces all cut and ready for constructing into blocks for a few years now.

There were a lot of flying geese in the making of this block. I wonder if there might be another way to construct it, but if you are not afraid of FG, then it shortcuts all those HSTs. 


I had some extra "pieces" so I incorporated them in the sashings. Don't you love when you get a secondary design doing this? 

So she is all sewn together and ready for the long arm quilter...if i don't decide to add a border that is. I kind of like that red print that has all the colors in the quilt top. Hmmm...

 - - - - - - - - -

Another UFO that is now ready for the long arm quilter is my On Ringo Lake. Ugh! This one has taken me so long to get off the design wall. Anyone who knows about Bonnie Hunter quilts, knows how much commitment they take.

While sewing the units together into blocks, I made an error and did not notice until almost 20 wear done. 


Those corner units should be turned around, but, okay. I like it this way!


But that meant I had to re-cut and re-sew all the sashing pieces. They were originally called for the peach color but that was too much so I opted for the mint green/blue. 


Steady on, a bit every day...its amazing how much you can get done in small time slots.


 But, Ah-Oh...because I switched out the corner units on the blocks, that threw off the setting triangle design. Now I had to re-design that, compute new templates and trust my math. 


Those required some hand sewing set-in seams. Okay, so far, so good. They all fit. Phew! I am loving this new design that I can call my own.


Then this is my least favorite part of quilt-making. Wrestling this quilt to sew on borders is hard on my OCD brain. All those loose threads drive me crazy but I look away and pretend everyone is playing nice behind there (seam allowances). Got to get this done and sandwiched into a quilt is my mantra!


And it is now ready! It is almost too big for the design wall. It is all folded nicely with the backing pressed and ready for the long arm quilter. Yippee!

- - - - - -

Then there is my Material Girls Friendship quilt blocks. It was number 8 on my UFO list and it is also now ready for the long arm quilter. I considered hand quilting this one. She is a manageable size.

I almost bowed out of this block swap but am now glad that I didn't. Our quilt group came up with this idea before Covid 19 hit and now I have these blocks to remember the fun Material Girls as we don't meet anymore. Hopefully that will change soon.


I am not a big fan of sampler blocks so I have been looking for different setting ideas that would give it some interest without spending too much time on it.


12 blocks would make it rectangular and I always prefer square quilts, so I made these wide center strips to take the place of another row of 16" blocks. 


Finishing with a Morse-code type border, I can say she is done. I have some yardage that will make a perfect backing. It is a gray toile type print with birds and branches. 


I chose the two colors, navy and gray for some reason off the top of my head. It has a contemporary feel to it now, and am happy with the finished result. So very anxious to get this one done too.

- - - - - -

It has been a productive month. I hope to keep the momentum up before spring hits the homestead. It gets busy here with outside chores and activities. Oh look! Another seed catalog was delivered in the mail today! 


I hope you are enjoying your progress in your sewing room. Stay warm and healthy!


Snow Days are Sew Days

We have been finally getting snow at my little piece of the rock. Yeah, I belong to that tribe that loves snow and snowy days. The wonder and the quiet of it all just amazes me. This was the view we awakened to this last January morning of 2022. Frozen fog as the sun just began to melt it off. I hope you carry this verse with you throughout this new week.

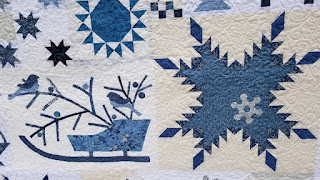
It has been a busy month in the sewing room. I have a finish to declare. It is my Patches in Blue quilt a-long with Edyta Sitar in 2018. (pictured before the big snowfall)


This quilt features a block from each project in her book. There were definitely some favorites in there and I would like to come back and revisit for another quilt-to-be. Besides, I haven't put a dent in my stash of blues.


 I love this feathered star block. I dressed it up a bit with a "snowflake" I made using 1/2" hexies. Do not attempt this if you cut your nails! Those little bits were hard to handle but so worth the effort I think. 


And of course I am a big fan of house blocks. And the baskets and birds warm my heart too. I made my own applique sticks instead of using Edyta's fusible appliques. I cut 3/4" bias strips, sewed 1/4 from one edge using a tiny running stitch. Then folded over and under another 1/4" to tack down with an applique invisible stitch. A bit more work, but I like the result.


I really liked the design of the top left block. It is titled, Frost and would make a lovely quilt using this block alone. 


And yes, those Blue Bell Flowers are a favorite too! I have that Lily pattern listed at the top of my Wish List. I added a few more hexie snowflakes to fill in some white space. 

I loved the border she suggested too. I forget how many HSTs were needed but it was in the hundreds. So...this was the perfect quilt to have finished this month of January.


I hope you are making progress with your projects and goals for the month and/or year.